S3 object storage
Introduction
S3 object storage (with the same API as Amazon S3 storage) allows users to store and retrieve any amount of data at any time from anywhere on the web. It provides a simple web services interface that can be used to store and retrieve any amount of data. It gives any developer access to highly scalable, reliable, and fast data storage infrastructure which is simple to access.
Key Concepts of object storage
Buckets: A bucket is a container in the storage where data is stored. Think of buckets as the top-level folders to organize your data and control access according to your requirements. Also quota limits are per bucket.
Objects: Objects are the fundamental entities stored in S3, analogous to files in file systems. Each object in a bucket is identified by a unique, user-assigned key (similar to a path/filename).
Note
In SLICES you can create multiple buckets per project (that are shared with all project members)
Interacting with the SLICES object storage
The object storage can be accessed via the web console, which provides a graphical interface to manage your buckets and objects. However, for more automated and scriptable interactions, the storage provides several other methods:
Command Line Interface (CLI): an S3 storage CLI tool allows you to perform all of the same actions as the web console and more. This tool provides commands for a broad set of functionality, and is ideal for scripting these commands.
S3 SDKs: AWS provides SDKs for several programming languages which enable developers to access S3 services programmatically. This is useful for integrating S3 into your applications or for developing complex scripts, e.g. for Python: Boto3 is the Amazon Web Services (AWS) SDK for Python. It allows Python developers to write software that uses S3 storage services. See further for an example.
First use of the SLICES S3 storage
You first need an account and project on the SLICES Portal, see register for an account.
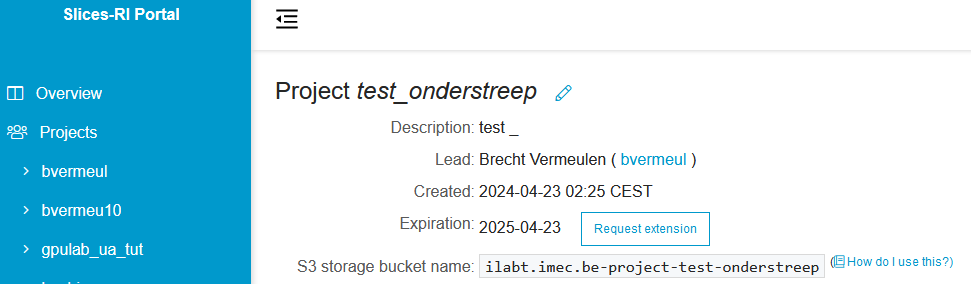
The project page on the portal contains specific information on the S3 storage bucket name for that project, see
screenshot.
(note: this is the same as the project name, started with ilabt.imec.be-project- and with the + and _ replaced by - in the project name)
After that, you can visit the web interface of the SLICES storage.
You choose Use Slices-RI account - iam to log in with your SLICES account.
The Object Browser view might be empty or might contain existing project buckets.
If your project that you want to use is not listed, then click Buckets on the left side, followed by
Create Bucket on the right side.
Fill in the exact bucket name that was shown on the Slices portal and click Create Bucket.
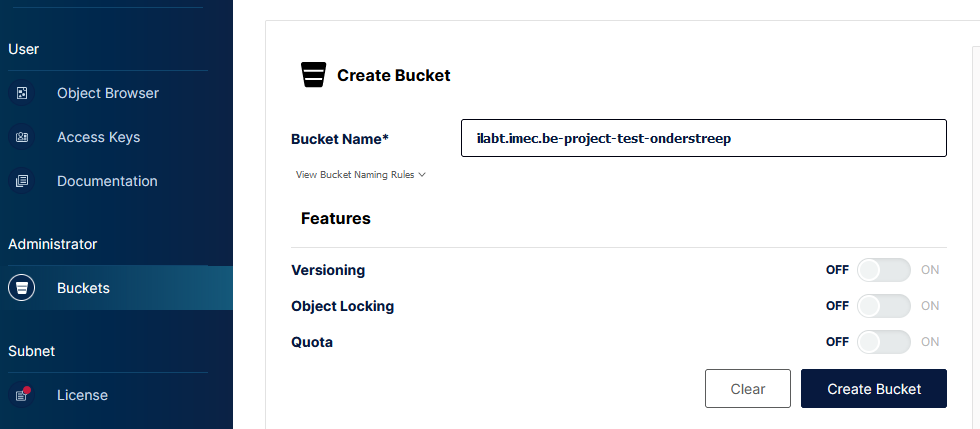
When succesful, you should have no error and see your new bucket in the list.
Note
If you try to create a bucket with an incorrect name, the website will fail silently.
Double check your bucket name if the Create Bucket button seems to have no effect. If that’s okay, then try to log out (Sign Out left bottom) and log in again.
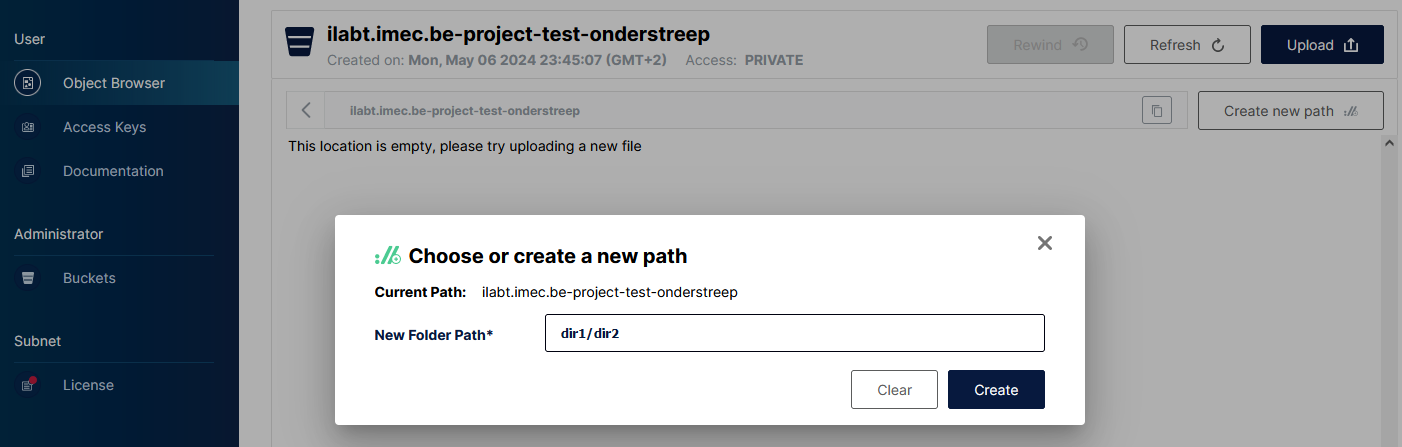
When returning to the Object Browser, you can click the bucket and upload files or create paths.
Accessing the storage with access keys
While you are at the S3 storage web console, you can create access keys that you can use with programming languages
or with CLI tools. Click Access Keys on the left, and Create access key on the right.
Fill in a name for the key and click Create. A pop-up window will show the access key and secret key.
Attention
The secret key cannot be retrieved later !

Python example
For accessing S3 storage through Python, one can use the boto3 library. This can be installed in various ways,
e.g. pip install boto3 when using pip, or apt install python3-boto3 when using APT on Debian/Ubuntu.
An example is shown below how to upload and download a file to a bucket. You need to fill in the right access, secret key and bucket name of course.
#!/usr/bin/env python3

import os
import boto3
from botocore.client import Config

s3 = boto3.resource('s3',
                    endpoint_url='https://s3.slices-be.eu',
                    aws_access_key_id='Srxxxxxxxxxxxxxx',
                    aws_secret_access_key='xxxxxxxxxxxx',
                    config=Config(signature_version='s3v4'))

# Upload a file from local file system '/users/bvermeul/testfile.txt'
# to bucket 'ilabt.imec.be-project-test-onderstreep' with 'testfile.txt' as the object name.
s3.Bucket('ilabt.imec.be-project-test-onderstreep').upload_file('/users/bvermeul/testfile.txt','testfile.txt')

print("Uploaded '/users/bvermeul/testfile.txt' to 'testfile.txt'.")

# Download the object 'testfile.txt' from the bucket 'ilabt.imec.be-project-test-onderstreep'
# and save it to local filesystem as /tmp/testing.txt
s3.Bucket('ilabt.imec.be-project-test-onderstreep').download_file('testfile.txt', '/tmp/testing.txt')

print("Downloaded 'testfile.txt' as '/tmp/testing.txt'.")
When you run this:
python upload_download.py
Uploaded '/users/bvermeul/testfile.txt' to 'testfile.txt'.
Downloaded 'testfile.txt' as '/tmp/testing.txt'.
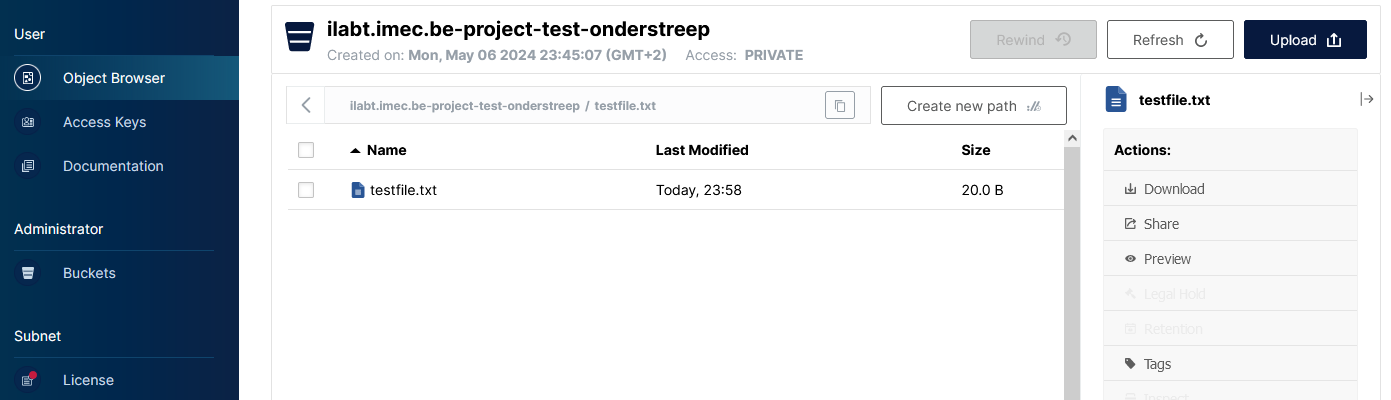
Of course, if you check with the Object Browser, you will see that the file has been added.
Using the CLI
You can of course also use a CLI tool, e.g. MinIO Client. You can download installers from https://dl.min.io/client/mc/release/. In the below commands, fill in your access key and secret key.
wget https://dl.min.io/client/mc/release/linux-amd64/mc
chmod 755 mc
./mc alias set slices https://s3.slices-be.eu Srxxxxxxxxxxxxxx xxxxxxxxxxxx
./mc du slices
116KiB  2 objects
./mc ls slices
./mc mirror --retry dir slices/ilabt.imec.be-project-test-onderstreep/dir         # to mirror a full directory tree dir/*
./mc mirror --retry . slices/ilabt.imec.be-project-test-onderstreep               # to mirror a full directory tree
See the list of commands for all relevant commands. Do not forget to add slices as target.
Quota
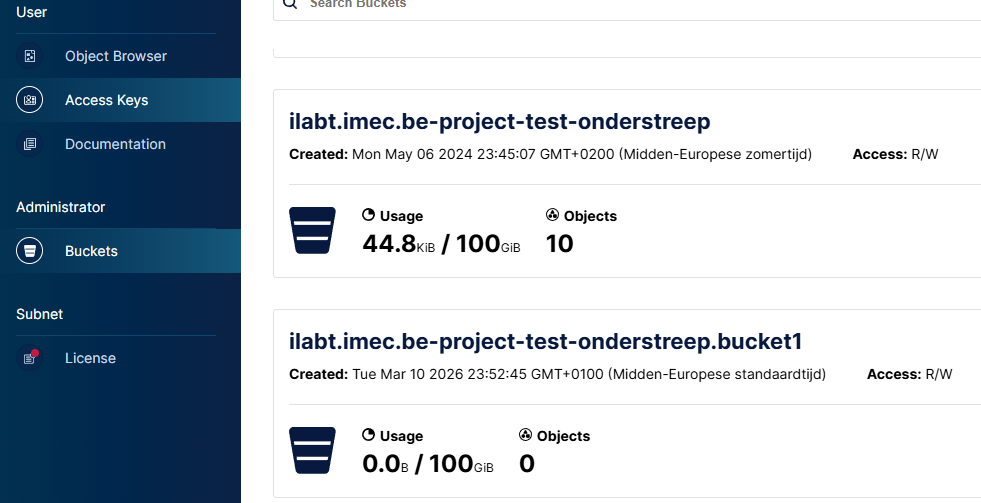
There is a default quota limit of 100GiB per bucket.
You can check the used storage and quota in the object browser, via the Object Browser and Buckets on the left
side, see screenshot. You will not be able to write files when you reach your quota.
Attention
As versioning is enabled, all versions of your files add up to the quota !
If you think you need more quota, you can visit the project page at https://portal.slices-ri.eu and click the
Request quota increase button and fill in the information to request more quota.
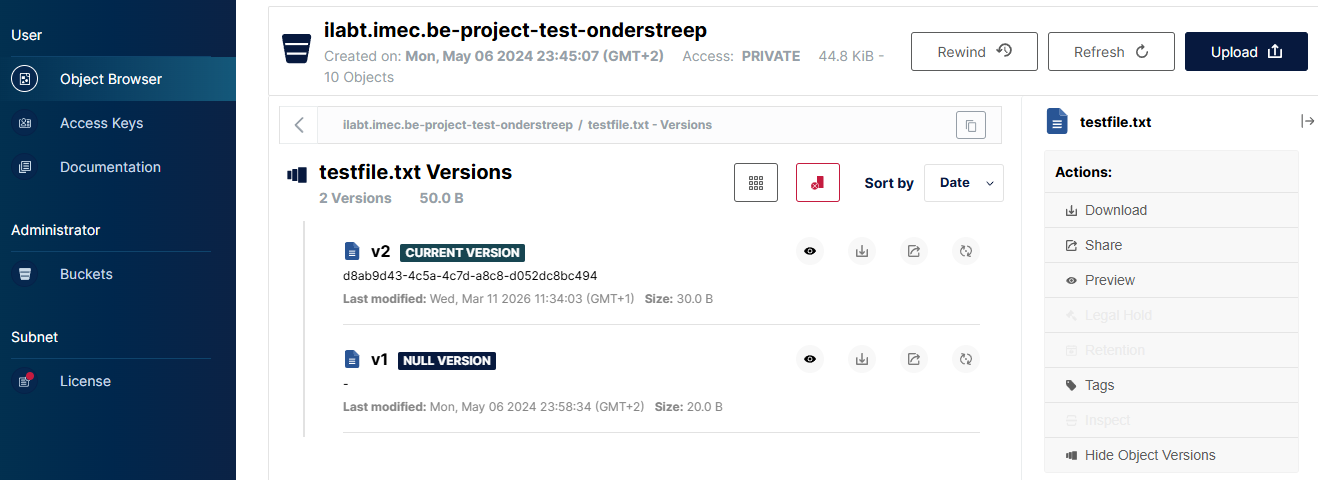
Versioning of objects
Because of the mirroring between two sites, versioning of the objects is turned on. If you overwrite a file, then it becomes
a new version, as can be seen in the screenshot (click on the right Display object versions to see this view).
If you have older files, it is possible that you will not see a version until you overwrite it, this is normal.
In this way, you can also revert individual objects, so it functions as a kind of backup.
The following CLI commands can give you also an insight.
./mc ls --versions slices/ilabt.imec.be-project-test-onderstreep
./mc stat --recursive --versions slices/ilabt.imec.be-project-test-onderstreep
./mc cat --version-id d8ab9d43-4c5a-4c7d-a8c8-d052dc8bc494 slices/ilabt.imec.be-project-test-onderstreep/testfile.txt
Attention
All versions of your files add up to the quota !
Optimise locations
The current S3 storage is mirrored on two locations be-gent1 and be-antwerp1 in an active-active way. In that
way the data can be accessed from multiple locations (for redundancy, but also for performance and latency).
Until now we used https://s3.slices-be.eu and that is the location that will work always (except if the service is completely down). However, https://s3-gent.slices-be.eu and https://s3-antwerp.slices-be.eu will give you access to the same data and functionality but via the respective location.
And there is a 3rd way to access the S3 storage, specifically meant for access from the SLICES research infrastructure (this will not work from your laptop). And that uses https://s3.sliceslocal:9060. In this way, wherever your code runs it will have the most optimal (regarding performance and fault tolerance) access to the storage.
There is one catch with the latter: it uses a self-signed certificate. So you need to adapt for this in the code.
#!/usr/bin/env python3

import os
import boto3
from botocore.client import Config
import urllib3

urllib3.disable_warnings(urllib3.exceptions.InsecureRequestWarning)
s3 = boto3.resource('s3',
                    endpoint_url='https://s3.sliceslocal:9060',
                    aws_access_key_id='Srxxxxxxxxxxxxxx',
                    aws_secret_access_key='xxxxxxxxxxxx',
                    verify=False,
                    config=Config(signature_version='s3v4'))
or another variant with using the certificate of the Certificate Authority:
import os
import boto3
from botocore.client import Config
import tempfile

CA_CERT="""
-----BEGIN CERTIFICATE-----
MIIFFTCCAv2gAwIBAgIUCl0vZjXWKfRYn99zSqTOEZwF9EswDQYJKoZIhvcNAQEL
BQAwGTEXMBUGA1UEAwwOaUxhYi50IFJvb3QgQ0EwIBcNMjYwMzA5MTUyOTQ2WhgP
MjA1NjA0MjAxNTI5NDZaMBkxFzAVBgNVBAMMDmlMYWIudCBSb290IENBMIICIjAN
BgkqhkiG9w0BAQEFAAOCAg8AMIICCgKCAgEAg0heBEcBsWeA376ZlerqpYHN08dS
VpRbl1VZzQ8a21YakXDMqB6Q2WjKx2taT0jfGqY23NsA04PrWg7j7IdaxMsPB5n7
p+2zt82mm7jpIe8/UP+JwnmHH1/R3HwGgl5MhP2O4GAdUFvpsqUOsG77Mc5hcDZK
VnBhBjC+4KuvaCVElQxz2BqYPL1+vBh7cah0xo/jAToilq1TFVe+bZ4J4qeoNuSX
VeLI6tlqnuMqOhBqClikI/ATg2nGXYFCvsDhOcNH74SMXuCpoxIzS6TkO616XcuJ
iHJbNc262OeQf8z9fh9KDOlaPBXR+ihGnvMgyDXmONW9O4wL64YGMretvgAkynxb
03Z43fSHNq68jmlUNybs2iro+w3qCTvx2Ei2KsptzPDEV2moTjpAP5XiJSTuxeZ6
7g/b171x4FeCdqsZmVaOWXwR7ubieG6Xf0dNjS9txBIAgLAK34XFRZXiRJRHIMF0
W5B7GKq8sqrRSbAroxBUOOL3bFrE8Gi4stsLfTPg/S4ePGneWlvzi2nzOaFFB8uw
KkPF7TUwtWvUtpwDrGzRQebfSvPKBWiQV2/KCdnSdIzqGaCBOH5p1rIYIoDdza7F
HXBGWTfnZQW2dxI89kPKjKxWk3BVmR15q0fUIwbxdoi5+IJ9iM0MWgLRIrII+S2N
O0gP5y6uce81lUMCAwEAAaNTMFEwHQYDVR0OBBYEFIDovEIB3kjgGHz1fbIICmNy
OahuMB8GA1UdIwQYMBaAFIDovEIB3kjgGHz1fbIICmNyOahuMA8GA1UdEwEB/wQF
MAMBAf8wDQYJKoZIhvcNAQELBQADggIBAFNhx7b/EQ40Wnwp6WeyLxSzv+WmzPBe
d44ngwyiNMW9Ic55YSo3x+q3cr72jiFi2s8E2YJSWMm3z/+BH4c9iJluQTbl+2oz
MkJ2OkGdESzsvLO2XKTGuvC3iZUuLrOx85azeo8fgZqnuHzDLVrXz01vsHjcHb66
HDRP5EqWhiTajmZWLe6pu8I4K9j3yM6IJ3VIz5hicdXrHjhiM5ATeW/ZgZoSZHvU
NmePLhbXQRN7Kdv2LVK4RUY7Fgw/zEe4yHZGiMeKwB9zy4lqIbBr6w1I9sp2+R7J
TonDUnUkgf+ZqCGr8ruXLrvBxLlOJBOvE1FclQm9XvabLw+gYf4tQH9TZYsNuytv
czrVoSgjT8vXxbTeQDBFCAlkvlY3YtSNCfY8CLkkFgsmPdOv9SlEdbRl2fVzc2b0
TUoQWJLxaJyBsqqSnvcINF+BX5LIY7bzcZHvTYsBDrONxGPSGasrvZ4kHiDtqnR4
ojRD4CCUM0vk6U1onoP+3+a4Rmgn4F/uav4FcZRFMIlwiOqMTbKJB73PinZ9Zthy
FRv6gS9Y2iX1ftixkdcO0qGHmRnYaOwBJ8O3fzYDjHGaoOUYcBQhfxEunh12oPjz
cacrSI/4etgeO4BAlFzwzycU65PWy0FdbgNh/eMpyF+E9sYC/PVJc8xg80cm3jBG
Vm01z7tIdMqG
-----END CERTIFICATE-----
"""

with tempfile.NamedTemporaryFile(delete=False) as f:
    f.write(CA_CERT.encode())
    ca_path = f.name

s3 = boto3.resource('s3',
                    endpoint_url='https://s3.sliceslocal:9060',
                    aws_access_key_id='Srxxxxxxxxxxxxxx',
                    aws_secret_access_key='xxxxxxxxxxxx',
                    verify=ca_path,
                    config=Config(signature_version='s3v4'))
For the CLI, there are also two options.
./mc --insecure ls ....
or write the above certificate in a file  ~/.mc/certs/CAs/s3.sliceslocal
Attention
It is not advised to write from Gent and Antwerp side on the same files at the same time to avoid surprises.
Advanced topics
Creating buckets
As shown, you can create buckets through the Object browser website, but it can also be done via the CLI.
You can create multiple buckets within the same project by adding a dot and then the bucket name.
./mc mb slices/ilabt.imec.be-project-test-onderstreep.bucket1/
Attention
The dot is crucial.
Policies to restrict access
If you have access to multiple projects, a new access key that you create will have access by default to all buckets of
all these projects (that exist at the time you create your access key).
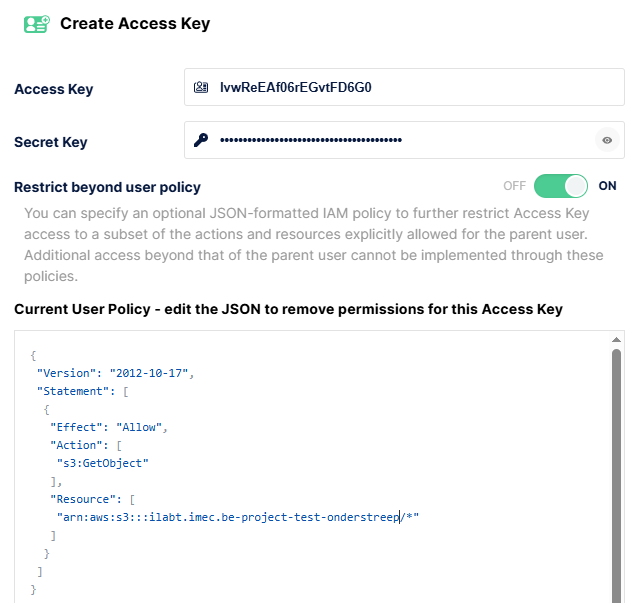
So you might want to restrict the access of access keys. You can do this (only in the creation step !) as follows: click
the Restrict beyond user policy button and add a policy. The screenshot shows a read-only policy to a specific path.
Another one that may be used, is just to restrict to certain projects (you can just edit the default that is shown),
see below. The internet and AI will help you to build more specific ones (e.g. giving access to only sub-paths).
{
 "Version": "2012-10-17",
 "Statement": [
  {
   "Effect": "Allow",
   "Action": [
    "s3:*"
   ],
   "Resource": [
    "arn:aws:s3:::ilabt.imec.be-project-test-onderstreep",
    "arn:aws:s3:::ilabt.imec.be-project-test-onderstreep/*"
   ]
  }
 ]
}
Questions and support
E-mail us at helpdesk@ilabt.imec.be