JupyterHub

Our JupyterHub runs directly on top of the Slices AI infrastructure. It lets you launch a Jupyter notebook server with a single click — choosing your GPU, memory, and Docker image from a web form — without writing a job definition or using the CLI.
If you already work with Jupyter notebooks, JupyterHub is the recommended starting point. Once you have developed and tested your code interactively, you can submit it as a batch job to scale up to multiple GPUs and longer runtimes.
For bug reports, questions and feedback:
E-mail us at gpulab@ilabt.imec.be
Getting Started
Starting your Jupyter instance
Go to https://jupyterhub.ai.slices-ri.eu and log in via your account provider.
Configure your Jupyter instance:
Docker image: choose one of the pre-built images (see Choosing a Docker Image below).
Resources: select the number of CPUs, GPUs, and amount of memory you need. Also select which storage locations you want to mount. Clusters that are incompatible with your storage selection will be greyed out automatically.
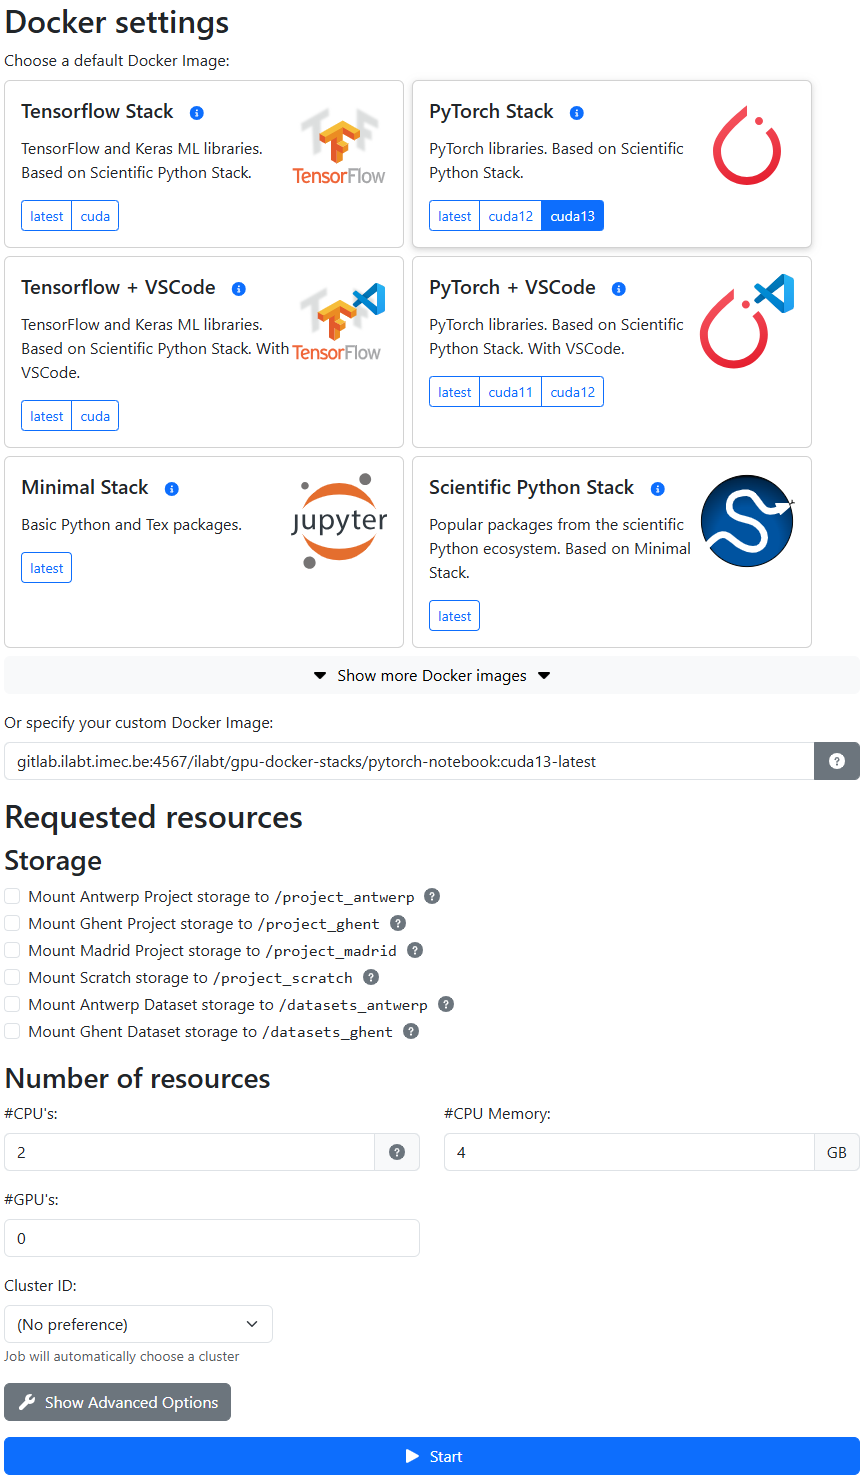
Click Start. Your instance should be ready within a few seconds.
Attention
If there are not enough resources available, you will receive a timeout error after a few minutes. Check available resources on the Slices AI infrastructure website, or contact us via email.
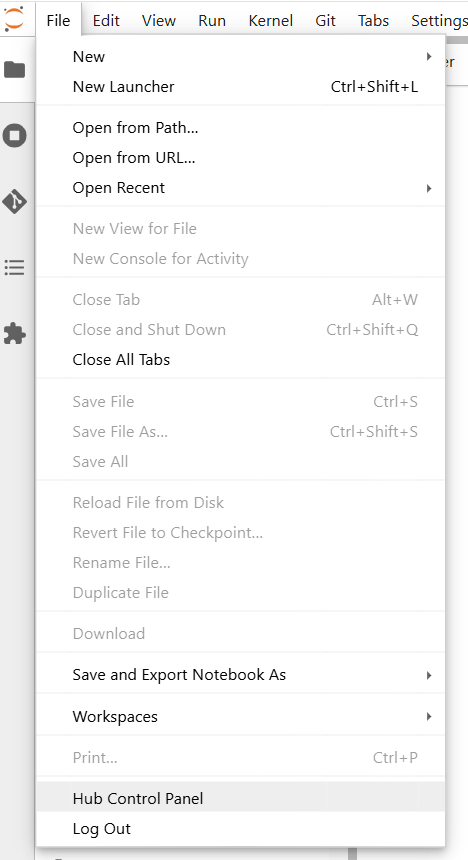
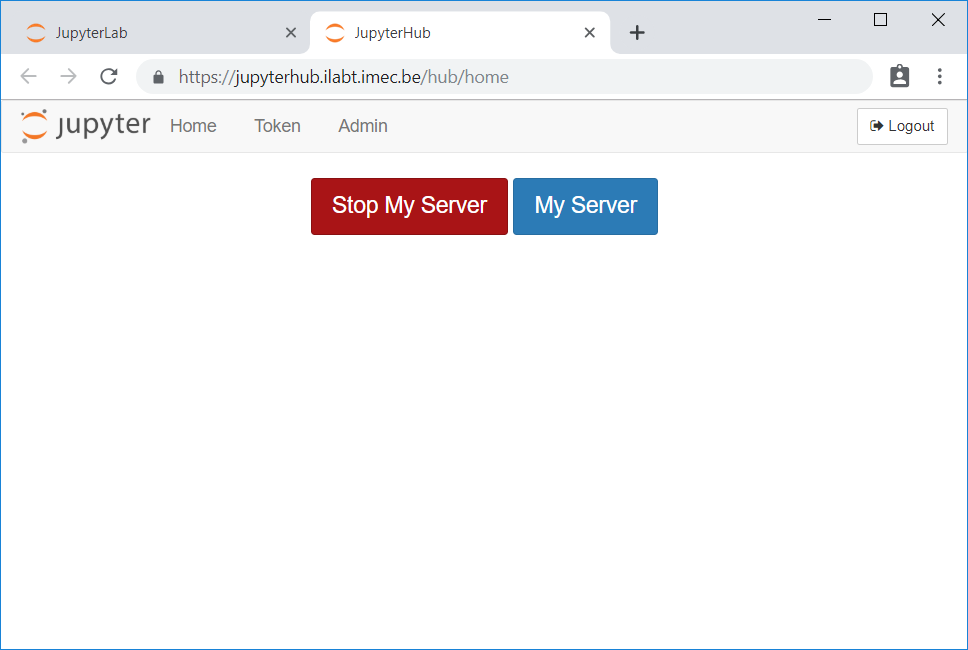
Stopping your Jupyter instance
When you are done, please shut down your instance to release the resources for other users:
In the JupyterLab menu, go to File → Hub Control Panel.
Click Stop My Server.
Warning
Your server will automatically shut down after 1 hour of inactivity. “Activity” means interacting in your browser (editing a notebook, using a terminal, etc.). Running computations are not counted as activity. Do not rely on this automatic shutdown when using a large amount of GPU resources — stop it manually when done.
Choosing a Docker Image
JupyterHub launches your notebook inside a Docker container. The Docker image determines which software is pre-installed. JupyterHub requires you to use a Jupyter “Docker stacks” image, which is a specific type of Docker image maintained by the Jupyter project that includes JupyterLab and some additional features.
The Jupyter project releases a set of different Jupyter Docker Stacks images that include popular data science and machine learning frameworks. Some of these images are also CUDA-enabled. We maintain a set of GPU-enabled images built on top of the Jupyter Docker Stacks, which we recommend for machine learning workloads as they contain some additional frequently used packages.
GPU-enabled images (recommended for ML workloads)
We maintain a set of GPU-enabled images built on top of nvidia/cuda. These are updated weekly and always include
recent stable releases of popular frameworks. You can find them in the
GPU Docker Stacks Container Registry.
For most machine learning work, start with one of these:
Image name |
Contents |
|---|---|
|
PyTorch (latest stable), CUDA 12, JupyterLab |
|
TensorFlow + Keras (latest stable), CUDA 12, JupyterLab |
Note
Not all images support all GPU architectures available on the Slices AI infrastructure. See the GPU software compatibility page for details.
Standard Jupyter Docker Stacks
If you do not need a GPU, the official Jupyter Docker Stacks images also work. Most are not GPU-enabled.
Image name |
Contents |
|---|---|
|
Popular scientific Python packages |
|
TensorFlow and Keras (CPU only) |
|
R language ecosystem |
|
Python, R, and Julia data analysis packages |
|
Python, R and Scala support for Apache Spark |

Adding Custom Software
If you need packages that are not in one of the pre-built images, you can build a custom Docker image that extends one of the GPU Docker Stacks images with your extra dependencies, push it to a registry, and enter its full path in the Docker image field on the spawn page.
The image you build for JupyterHub can be used in batch jobs too — build it once, use it everywhere.
See Build and use a custom Docker image for a step-by-step walkthrough covering the Dockerfile, registry login, push, and how to reference a private image in a job definition.
Running Web-Based Tools
Some tools (TensorBoard, RStudio, Shiny, etc.) expose a browser-based UI on a local port. There are two ways to access them from within your JupyterHub session.
Note
Port 8888 is reserved for the Jupyter server. Use any other port for your tools.
Using Jupyter Server Proxy (recommended)
Jupyter Server Proxy is a Jupyter extension that proxies requests
from a /proxy/<port>/ URL to a local service running inside your container.
Note
This extension is not installed in all of Jupyter Docker Stacks images maintained by the Jupyter project. It is installed in all GPU-enabled images maintained by us.
If you want to use it with another image, you will need to include it in a custom Docker image (see Adding Custom Software above). A ready-to-use TensorBoard + Jupyter Server Proxy Dockerfile is available as an example.
You can try this example immediately by using the image
gitlab.ilabt.imec.be:4567/twalcarius/notebooks/tensorboard-notebook:latest in the JupyterHub launch form.
Example: TensorBoard
In a notebook terminal, start TensorBoard:
tensorboard --logdir /project_ghent/my-logs
TensorBoard listens on http://localhost:6006. Access it by changing the path in your JupyterHub URL to
/proxy/6006/:
https://jupyterhub.ai.slices-ri.eu/user/<your-username>/proxy/6006/
Important
Do not forget the trailing / — the tool will fail in unexpected ways without it.
Using exposed ports
Alternatively, under Advanced Options on the JupyterHub launch page, you can enter extra ports to expose as a comma-separated list.
When these ports are exposed, the Slices AI infrastructure maps them to host ports in the 5000-6000
range.
Important
Exposed ports are only accessible over IPv6 or via the iGent VPN. Anyone with an IPv6 connection can reach them. Make sure any exposed service is properly secured.
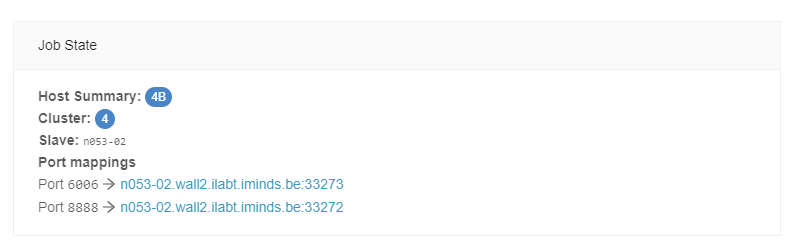
After starting your instance, find the hostname and mapped port via the Slices AI infrastructure website (in the General Info tab of the corresponding job), or with the CLI:
❯ slices ai show <job-id>
From JupyterHub to a Batch Job
JupyterHub is designed for interactive development: writing code, inspecting data, and short training runs. Once your experiment code is ready, submit it as a batch job on the Slices AI infrastructure to:
Run for longer than 24 hours without risk of the server timing out.
Use more GPUs than the fair-use limit for JupyterHub allows.
Submit many jobs in parallel (hyperparameter sweeps, multiple seeds, etc.).
The typical path is:
Develop and debug your training script interactively in JupyterHub using 1 GPU.
Save your script to your project storage (
/project_ghent,/project_antwerp, etc.).Write a job definition that uses the same Docker image and runs your script. (cfr. the contents of the “Docker image” field in the spawn form.)
Submit it via the CLI:
slices ai submit myjob.json.
See Getting Started for a step-by-step walkthrough and the CLI reference for all available commands.
Fair Use Policy
JupyterHub sessions run on shared GPU hardware. Please follow these guidelines:
Resource usage
The following resource usage is considered fair use for a JupyterHub session:
1 GPU (2 if you genuinely need concurrent processes)
4 CPU cores
40 GB CPU RAM
If you need more than this, run your workload as a batch job on the Slices AI infrastructure directly. You can request an increase by contacting us with a justification.
Session duration
Sessions should only last as long as you are interactively working. The maximum session duration is 24 hours (hard limit: 72 hours). Submit batch jobs for workloads that run longer than a few hours.
Please stop your server when you are done to release resources for other users.
Troubleshooting
My notebook server was killed while a computation was still running
This is expected behaviour. JupyterHub is shut down automatically after 1 hour of inactivity. Running cells are not considered “activity.” For long-running computations, submit a batch job instead — it will continue running until the computation finishes, regardless of browser activity.
If the server was killed unexpectedly during active use, the underlying job may have run out of memory. You will receive an email when this happens. Try requesting more CPU memory on the launch page, or reduce your workload’s memory footprint.
I’m getting a 403 error when accessing my project storage
If you see Invalid response: 403 Forbidden or 403 Permission Denied when accessing /project_ghent,
/project_antwerp, or /project_scratch, the directory permissions have likely been changed (sometimes
triggered by other tools that manage the project directory).
Open a terminal in JupyterHub and run:
sudo chmod uog+rwx /project_ghent
Or for a specific subdirectory:
sudo chmod -R uog+rwx /project_ghent/mysubdir
How do I run TensorBoard or other web UIs inside JupyterHub?
Use Jupyter Server Proxy (recommended) or exposed ports. Both options are described in Running Web-Based Tools above.
How do I add more than 10 GB of data to my container?
You cannot install more than 10 GB of data inside the running container. This limit only applies to changes made after the container starts (e.g., downloading datasets into the container filesystem).
Please refer to Storage for a guide on where to store your datasets.
If large software installations are causing you to exceed the 10 GB limit, you can pre-install them in a custom Docker image (see Adding Custom Software above), or create a Python virtual environment on one of the permanent storage directories.