Quantum Key Distribution Blueprint
What is Quantum Key Distribution?
Quantum Key Distribution (QKD) is a cryptographic technology that leverages the principles of quantum mechanics to securely distribute cryptographic keys between two communicating parties. Unlike conventional public-key cryptography, whose security relies on the computational difficulty of mathematical problems, QKD derives its security from the fundamental laws of physics.
As quantum computing advances, many widely used asymmetric cryptographic algorithms are expected to become vulnerable to quantum attacks. QKD addresses this challenge by enabling the generation and distribution of shared secret keys in a manner that can detect eavesdropping attempts and remains secure even against adversaries equipped with quantum computers.
By providing a quantum-safe mechanism for key exchange, QKD represents a key building block for the next generation of secure communication systems.
Quantum Principles Behind QKD
QKD relies on several fundamental principles of quantum mechanics:
Superposition: A quantum particle, such as a photon, can exist in multiple possible states simultaneously until it is measured. In QKD, information is often encoded in different photon polarization states.
Entanglement: Two quantum particles can become linked so that measurements performed on one determine the state of the other, even when separated by large distances.
No-Cloning Theorem: An unknown quantum state cannot be copied perfectly. This prevents an attacker (eavesdropper) from making exact copies of transmitted quantum information without being detected.
Measurement Disturbance: Measuring a quantum state generally changes it. If someone tries to observe a photon during transmission, they inevitably introduce detectable disturbances.
Main Components of a QKD System
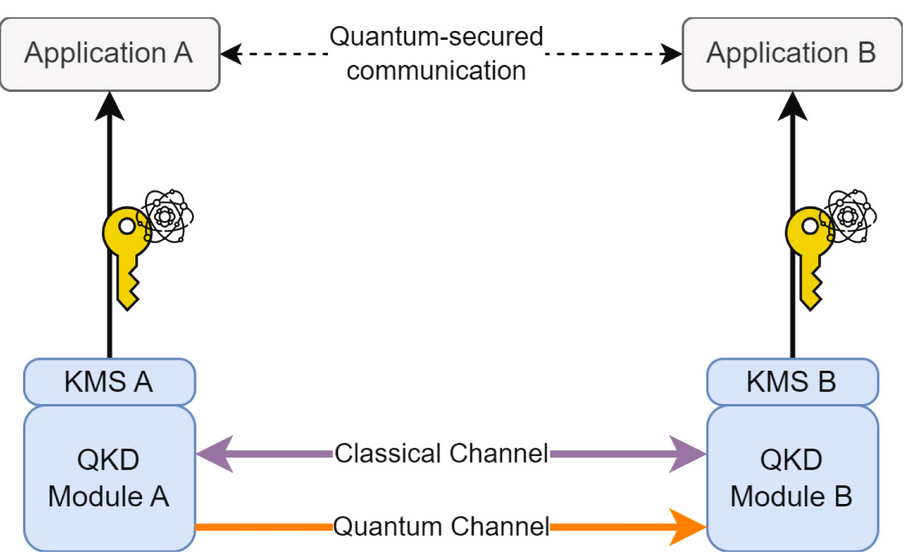
A QKD system typically consists of four main elements:
Alice (Transmitter): Generates random bits, encodes them into quantum states (photons), and sends them through the quantum channel.
Bob (Receiver): Measures the incoming photons to recover the transmitted information.
Quantum Channel (QC): A fiber-optic or free-space optical link used to transmit photons carrying quantum information.
Authenticated Classical Channel (CC): A conventional communication channel used for coordination and post-processing. No secret key information is sent through this channel; it is used only to compare measurement settings and verify the integrity of the generated key.
In addition to these elements, each QKD node contains a Key Management System (KMS) that enables applications to use the quantum-generated keys with conventional encryption protocols. A KMS is responsible for:
Stores generated keys securely.
Synchronizes keys with the peer KMS.
Delivers keys to applications when requested by applications.
Manages key lifecycles and usage policies.
This QKD architecture is called prepare-and-measure QKD. It’s the most commonly deployed QKD architecture and the one used in this blueprint currently. The most well-known prepare-and-measure protocol is BB84.
QKD Key Generation Process
The QKD key generation process in the BB84 protocol consists on several phases.
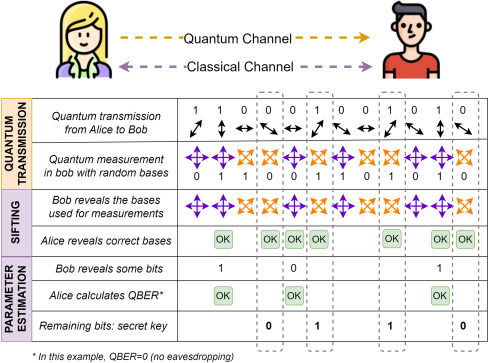
Quantum Transmission
Alice begins by generating a random sequence of bits. Each bit is encoded into a photon using a randomly selected polarization basis.
For every photon received, Bob also randomly chooses a measurement basis. Quantum mechanics dictates that:
If Bob chooses the same basis used by Alice, he obtains the correct bit value.
If he chooses a different basis, the result is completely random.
At this stage, Alice and Bob possess correlated but not identical bit strings known as the raw key.
Sifting
Using the classical channel, Bob announces which measurement bases he used, without revealing the measured bit values. Alice then indicates which measurements were performed with matching bases.
Both parties discard all bits corresponding to mismatched bases and keep only the matching ones. The remaining bits form the sifted key.
Parameter Estimation
To check whether the transmission was intercepted, Alice and Bob publicly compare a small subset of their remaining bits. In particular, they calculate the Quantum Bit Error Rate (QBER), which measures how many bits disagree.
Low QBER: Errors are consistent with normal noise; the key is likely secure.
High QBER: Excessive disturbances suggest eavesdropping or severe channel problems.
If the QBER exceeds a predefined threshold, the protocol is aborted and all generated bits are discarded. Thus, unlike classical communication systems, where interception can occur invisibly, QKD provides a built-in mechanism to reveal the presence of an eavesdropper.
Error Correction and Privacy Amplification
Even without an attacker, transmission noise can introduce errors. Error correction removes remaining discrepancies between Alice’s and Bob’s keys, to ensure that both parties possess identical copies of the key. Additionally, privacy amplification reduces any partial information that an attacker might have obtained, producing a shorter but provably secure final key.
The final result is a shorter but completely secure secret key that can be used by cryptographic applications.
What is the SLICES QKD Blueprint?
The SLICES QKD Blueprint is an experimental environment designed to help researchers and developers gain practical experience with Quantum Key Distribution (QKD) technologies without requiring physical QKD hardware. It demonstrates the complete lifecycle of QKD-generated keys, from their creation through a simulated BB84 protocol to their consumption by secure applications.
The blueprint provides hands-on familiarity with Key Management Systems (KMS), showing how QKD-derived cryptographic keys are distributed, managed, and retrieved within a QKD network through the ETSI GS QKD 014 API. It also shows how to develop and test applications that leverage QKD-generated keys to enhance communication security.
The blueprint is deployed on a two-node Kubernetes cluster, where each node represents a QKD site:
Alice node
SimulaQron QKD simulator
KMS instance
TLS PSK server application with web UI
Bob node
SimulaQron QKD simulator
KMS instance
TLS PSK client application with web UI
The main components of the blueprint are:
Two QKD simulators based on SimulaQron, implementing the BB84 protocol.
Two KMS instances (one per site) exposing the ETSI GS QKD 014 API for QKD key retrieval and distribution.
A quantum-secured chat application that uses QKD-derived keys to establish TLS 1.2 PSK (Pre-Shared Key) sessions.
A minimal ETSI GS QKD 014-compliant client that allows experimenters to integrate and test their own secure applications.
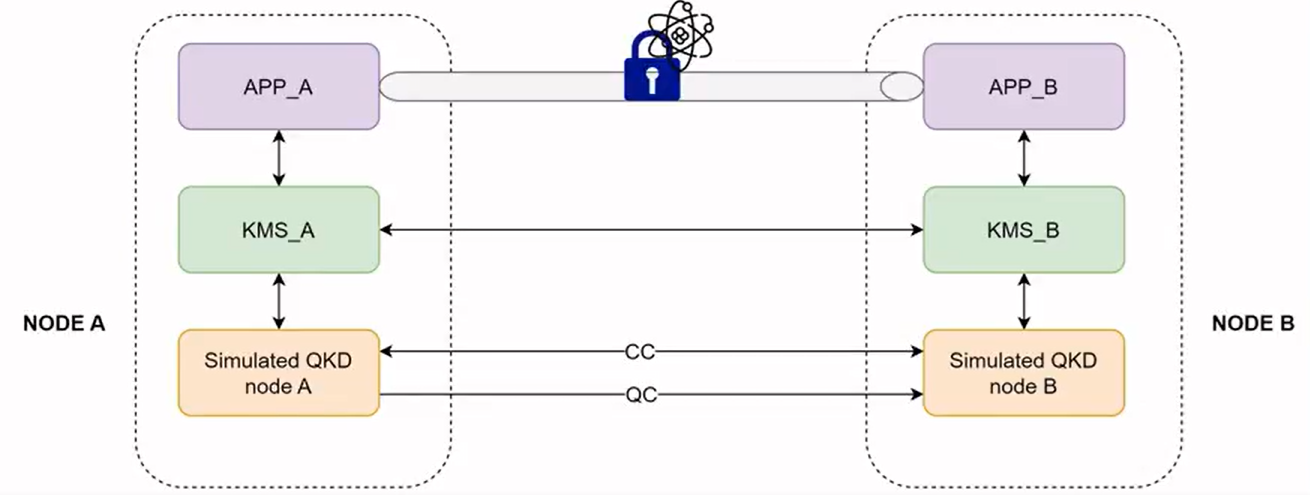
The blueprint provides a complete quantum-safe key usage flow:
Alice and Bob execute a simulated QKD process using the BB84 protocol through SimulaQron.
The generated cryptographic keys are stored and managed by the local KMS instances.
Applications retrieve QKD-derived keys from their respective KMS nodes using the ETSI GS QKD 014 API.
Retrieved keys are used as pre-shared keys (PSKs) for establishing a TLS 1.2 secure session.
Users exchange messages through the web interface, with communications protected by QKD-derived cryptographic material.
QKD Blueprint Tutorial
Prerequisites
The prerequisites to use the blueprint are:
Have a Slices account and a project you can use
Have the SLICES CLI installed
Have a quick look at the Slices basic infrastructure commands
Have a basic understanding of kubernetes and containers
Have Wireshark installed in your system for experimentation with the blueprint
Preparation of the Environment
First authenticate with the SLICES CLI and create an experiment in your project. Replace $PROJECT_NAME with your project’s name or set an environment variable.
slices auth login
slices project use $PROJECT_NAME
We can verify that login is fine as follows:
slices auth show
slices project show
We will need to create the experiment container to run this blueprint, with the appropriate duration (one day in this example). Replace $EXPERIMENT_NAME with your project’s name or set and environment variable.
slices experiment create $EXPERIMENT_NAME -d 1d
Then we will create the two virtual machines that will enable us to create the kubernetes cluster. One of them will allocate the components of Alice (node-alice), and the other one the components of Bob (node-bob). The Alice node will act as the kubernetes master node, and the Bob node as a worker node in the cluster.
In the following commands, specify the correct path (in the –ssh-key-file argument) to your public key that will be necessary to SSH into the virtual machines. Also specify the appropriate duration (one day in this example, like the experiment).
slices bi --site-id be-gent1-bi-vm1 create node-alice --flavor medium --public-ipv4 --ssh-key-file .ssh/id_rsa.pub -d 1d --experiment qkd-blueprint-k8s
slices bi --site-id be-gent1-bi-vm1 create node-bob --flavor medium --public-ipv4 --ssh-key-file .ssh/id_rsa.pub -d 1d --experiment qkd-blueprint-k8s
We wait until the machines are up and running. Rerun the following command until the status of both is up. This command will also reveal the IP addresses allocated to each virtual machine.
slices bi --site-id be-gent1-bi-vm1 list-resources --experiment $EXPERIMENT_NAME
We can now SSH into both machines in separate terminals, using their public IPv4 address output by the list-resources command. The user is ubuntu. You can SSH into both machines using separate terminal windows.
ssh ubuntu@<node-alice-ip>
ssh ubuntu@<node-bob-ip>
Installation of Kubernetes Cluster
First we will clone in both machines the repository where all the artifacts and scirpts required to run the Blueprint are stored.
git clone https://gitprojects.i2t.ehu.eus/slices-euskadi/qkd-blueprint
After this, we can proceed with the installation of Kubernetes. The following script will take a few minutes per node, as it will also build the container images of the blueprint required by each node.
In node-alice:
cd ~/qkd-blueprint/k8s_setup
./k8s_master_setup.sh
Simultaneously to the installation of the master node, we can install the worker node and build the required images in node-bob:
cd ~/qkd-blueprint/k8s_setup
./k8s_worker_setup.sh
Once both scripts have completed, we can verify that the cluster has been installed correctly. From node-alice, run:
kubectl get all -A
All the pods should have a status of Running.
Then, we can add node-bob to the cluster. To do this, run in node-alice:
kubeadm token create --print-join-command
Paste the output in node-bob and execute it with sudo:
sudo kubeadm join (...)
Then we can verify that both nodes are part of the cluster and ready by running in node-alice:
kubectl get nodes -o wide
We can also check that the container images required for the blueprint in each of the two nodes have been successfully built.
sudo nerdctl -n k8s.io images | grep blueprint
You should see blueprint/etsi014-cli, blueprint/kms-alice-sql, blueprint/sim-alice-sql, and blueprint/client-a in node-alice, and blueprint/kms-bob-sql, blueprint/sim-bob-sql, and blueprint/client-b in node-bob.
Blueprint Deployment
Now that the cluster is installed and the images built, we can deploy the blueprint. We’ll run the following commands from the master node (node-alice).
First, create a dedicated kubernetes namespace for the blueprint named qkd-blueprint:
kubectl create ns qkd-blueprint
Pods use node selectors in order to be bound to the right node, either node-alice or node-bob. Thus, we have to label the nodes to match the node selector rules in the deployment files:
kubectl label node node-alice role=alice
kubectl label node node-bob role=bob
Deploy all pods, followed by all services:
cd ~/qkd-blueprint
kubectl apply -f deployments.yaml -n qkd-blueprint
kubectl apply -f services.yaml -n qkd-blueprint
And wait until all pods have a status of Running.
kubectl get all -n qkd-blueprint
Blueprint Usage and Experimentation
Once all the components are running, the blueprint can be used to explore the complete lifecycle of QKD keys:
Simulated execution of the BB84 protocol.
Storage of the generated keys in the local KMS instances.
Retrieval of matching keys by secure applications.
Establishment of a TLS 1.2 session based on PSK using QKD material.
Packet-level inspection of the protected TLS session.
Manual interaction with the KMS instances through an ETSI GS QKD 014-based client.
Inspect the Component Logs
The logs make it possible to observe the internal activity of the blueprint, including key generation, storage, retrieval and application usage. First, list the current pod names:
kubectl get pods -n qkd-blueprint
To follow the Alice simulator logs:
kubectl logs -n qkd-blueprint <sim-alice-pod-name> -f
To follow the Bob simulator logs:
kubectl logs -n qkd-blueprint <sim-bob-pod-name> -f
If we open both logs in separate terminals, we can see the behaviour of the QKD simulators that perform the BB84 protocol to generate QKD keys between Alice and Bob. The logs show both the quantum transmission phase and the post-processing phase. Additionally, they show when the generated keys are stored in the KMS instances.
Similarly, the same procedure can be used for the KMS instances:
kubectl logs -n qkd-blueprint <kms-alice-pod-name> -f
kubectl logs -n qkd-blueprint <kms-bob-pod-name> -f
These logs show activity when clients request keys or when an error occurs.
Access the Secure Chat Application
The blueprint includes two web applications:
Alice provides the TLS 1.2 PSK server.
Bob connects to Alice as a TLS 1.2 PSK client.
To access each service, open the following URLs in a browser:
http://<node-alice-ip>:30010/?id=ClientA

http://<node-bob-ip>:30011/?id=ClientB
The first URL opens the Alice interface and the second URL opens the Bob interface. Once both web interfaces are open, start the applications in the following order:
In the Alice interface, click Start Quantum-Safe Session.
Alice starts a TLS 1.2 PSK server on TCP port 4444 and waits for an incoming connection.
In the Bob interface, click Start Quantum-Safe Session.
Bob obtains a QKD-derived key and its associated identifier from the Bob KMS.
Bob communicates the key identifier to Alice in a TLS handshake message.
Alice uses the received identifier to retrieve the corresponding key from the Alice KMS.
Both applications establish a TLS 1.2 PSK session using the retrieved QKD key.
The web interfaces show that the secure-chat session is ready.
The cryptographic key itself is not transmitted from Bob to Alice. Only the key identifier is exchanged. Each application retrieves its copy of the shared secret from its local KMS. Once the TLS session has been established:
Send a message from Alice.
Confirm that it appears in the Bob interface.
Send a response from Bob.
Confirm that it appears in the Alice interface.
The messages are transported through the TLS session and protected using QKD-derived cryptographic material.
Capture the TLS Traffic
The secure-chat traffic can be captured and inspected with Wireshark to verify that the TLS session is actually being established using the QKD key as PSK, and that the exchanged messages are therefore secured.
First, start a packet capture in one of the nodes using tcpdump:
sudo apt install tcpdump -y
cd ~
sudo tcpdump \
  -i any \
  -nn \
  'tcp port 4444' \
  -w quantum-safe-chat.pcap
Leave the capture running and perform the following actions:
Start a new session from Alice.
Connect from Bob. IMPORTANT! Save or copy the QKD key value that appears in Bob’s interface (right panel) for later use.
Send several messages in both directions.
Stop the traffic capture with Ctrl+C.
Copy or download the capture file to your local computer. You can for example use scp from your local computer to retrieve the capture file, as follows:
scp ubuntu@<node-ip>:~/quantum-safe-chat.pcap .
Then, inspect the TLS Handshake with Wireshark. Apply the TLS filter to locate the TLS handshake, and inspect the following messages:
Client Hello: It should contain at least the PSK-based Cipher Suite that is used in the application: TLS_PSK_WITH_AES_256_GCM_SHA384 (0x00a9).
Server Hello: It should select the Cipher Suite that is used in the application: TLS_PSK_WITH_AES_256_GCM_SHA384 (0x00a9).
Client Key Exchange: Expand the
PSK Client Params -> PSK Identityfield, containing the QKD key identifier that Bob sends to Alice.Application Data: These packets contain the encrypted messages exchanged through the secure-chat application.
Before configuring Wireshark with the PSK, the application payload is shown as encrypted data. The cleartext chat messages should not be visible.
For demonstration purposes, retrieve the QKD-derived key used for the captured session from the application web interface. Wireshark expects the PSK value in hexadecimal format. Then, in Wireshark:
Open Edit → Preferences.
Select Protocols → TLS.
Locate the Pre-Shared-Key field.
Paste the hexadecimal QKD-derived key.
Apply the configuration.
Return to the captured packets.
Inspect the TLS application-data records again.
Wireshark should now be able to decrypt the traffic and display the exchanged chat messages.
This experiment confirms that the QKD-derived key retrieved from the KMS is the PSK used to protect the TLS session. The disclosure of the key to Wireshark is only appropriate for testing purposes.
Test the Key Delivery API Manually
The blueprint includes a minimal command-line client for interacting directly with the KMS instances. The client exposes the main key-delivery operations used by the applications and follows the ETSI GS QKD 014 API structure.
The available operations are:
Option |
Operation |
Description |
|---|---|---|
1 |
Get Status |
Retrieve key-availability information from the KMS instances |
2 |
POST enc_keys |
Request a new QKD-derived key and its identifier |
3 |
POST dec_keys |
Retrieve the matching key from the peer KMS using the key identifier |
4 |
Change direction |
Select Alice or Bob as the initiating side |
0 |
Exit |
Close the command-line client |
To run this application, first, locate the CLI pod:
kubectl get pods -n qkd-blueprint | grep etsi014
Start the CLI Client:
kubectl exec -it deploy/etsi014-cli -n qkd-blueprint -- python3 /app/etsi014_client.py
The application displays the following initial menu:
ETSI GS QKD 014 CLI test client
Select master KMS:
A → Master KMS A, slave side KMS B
B → Master KMS B, slave side KMS A
To retrieve and compare a QKD-derived key:
Select A as the master KMS.
Select option 1 to inspect the status of the KMS instances.
Select option 2 to request a new key using enc_keys.
Copy the returned key_ID.
Select option 3 to request the matching key from the Bob KMS using dec_keys.
Paste the previously obtained Key Identifier when asked.
Verify that both responses contain the same cryptographic key.
A successful get status response contains information similar to:
[KMS A] Status
{
  "source_KME_ID": "KMS_A",
  "target_KME_ID": "",
  "master_SAE_ID": "192.168.124.222",
  "slave_SAE_ID": "bob",
  "key_size": 256,
  "stored_key_count": 3832,
  "max_key_count": 100000,
  "max_key_per_request": 1,
  "max_key_size": 256,
  "min_key_size": 256,
  "max_SAE_ID_count": 0
}

[KMS B] Status
{
  "source_KME_ID": "KMS_B",
  "target_KME_ID": "",
  "master_SAE_ID": "192.168.124.222",
  "slave_SAE_ID": "bob",
  "key_size": 256,
  "stored_key_count": 3833,
  "max_key_count": 100000,
  "max_key_per_request": 1,
  "max_key_size": 256,
  "min_key_size": 256,
  "max_SAE_ID_count": 0
}
A successful enc_keys response contains information similar to:
[ENC_KEYS response]
{
  "keys": [
    {
      "key_ID": "000dfaf8-1e31-4094-99d8-2302365abd63",
      "key_ID_extension": "",
      "key": "PKw7G2UU8lMGqd+2I6+9K7eUhIzG2YXwhcbOw6/oZx8=",
      "key_extension": ""
    }
  ]
}
The corresponding dec_keys request retrieves the same key from the other KMS instance.
Select option 4 and choose B as the master KMS to repeat the experiment in the opposite direction. This demonstrates that either application can initiate a key request.
Each retrieved key is consumed from the relevant KMS key pool. If no keys are available, inspect the simulator and KMS logs to confirm that additional QKD-derived material is being generated.